You must have heard of keyboard with dedicated music keys but with dedicated Facebook keys is sounding so unreal. Well, there is a good news for all the Facebook lovers, now you can get a keyboard with 19 dedicated key on it. S.N.A.K – Social Networks Access Keyboard can be termed as a Facebook Keyboard in true sense, thought this is not from the company. SNAK has 19 Facebook dedicated keys on it(11 on the left hand side and 8 on the right hand side).
Showing posts with label PC. Show all posts
Tuesday, March 29, 2011
Keyboard with 19 dedicated Facebook keys
You must have heard of keyboard with dedicated music keys but with dedicated Facebook keys is sounding so unreal. Well, there is a good news for all the Facebook lovers, now you can get a keyboard with 19 dedicated key on it. S.N.A.K – Social Networks Access Keyboard can be termed as a Facebook Keyboard in true sense, thought this is not from the company. SNAK has 19 Facebook dedicated keys on it(11 on the left hand side and 8 on the right hand side).
Saturday, August 7, 2010
Olive Pad - 3G Android tablet
After the launch of Apple's iPad, many companies are trying to launch their own tablet and internet access devices. Apple being costly, and not every one can afford it. So here is a good news for all the tech lovers to be happy about. Apart from Apple , Dell models they have a new option Olive Pad.
Well this is Expected to be in the range of
Sunday, August 1, 2010
Bloopers in Creating a Strong Password
Many time people ask this question what should we do to create a strong password? Many of you while choosing a password do some bloopers that you should avoid.
1. Avoid using sequences or repeating characters like 123456789 or abcdefghi or 7777777
2. Avoid using login name, birthday,or similar information as your password.
3. Avoid using same password for all the accounts
4. Avoid using online storing of your passwords.
Don.t do these steps while creating a password. Be careful while choosing a password.
Thanks for Stopping by Tech75. You can leave a comment to let me know your feedback and can also subscribe to the RSS feeds for regular updates.
Avoiding easy to guess passwords
1. Avoid using sequences or repeating characters like 123456789 or abcdefghi or 7777777
2. Avoid using login name, birthday,or similar information as your password.
3. Avoid using same password for all the accounts
4. Avoid using online storing of your passwords.
Don.t do these steps while creating a password. Be careful while choosing a password.
Thanks for Stopping by Tech75. You can leave a comment to let me know your feedback and can also subscribe to the RSS feeds for regular updates.
Check the Strength of your Passwords Online
You think many time what to keep passwords for your email accounts so that they don't get hacked by professionals. Now Microsoft has launched tool with which you can check the strength of your password online.
Microsoft Password Checker is an free online tool which will help you calculate the strength of you password, whether it is good enough.
The strength of you password depends upon the different types of character that you have used in your password. You should try to use a password that has a minimum of 14 characters in your password.
Thanks for Stopping by Tech75. You can leave a comment to let me know your feedback and can also subscribe to the RSS feeds for regular updates.
Microsoft Password Checker is an free online tool which will help you calculate the strength of you password, whether it is good enough.
The strength of you password depends upon the different types of character that you have used in your password. You should try to use a password that has a minimum of 14 characters in your password.
Thanks for Stopping by Tech75. You can leave a comment to let me know your feedback and can also subscribe to the RSS feeds for regular updates.
Wednesday, July 28, 2010
Multiple Log on To your Yahoo Messenger
Many of you might have more than 2 accounts on yahoo for chatting and other personal stuffs. But you cannot log on to that site for chat all together. Infact you can log on to Yahoo messenger using one account only. But with this simple hack, you can log in with multiple id on Yahoo Messenger.
Multiple login on Yahoo Messenger
1 Go to Start menu > Run > Regedit
2.Look for HKEY_CURRENT_USER/software/yahoo/pager/test.
3. On the left pane, right click on Data > click a new dword value for default.
4. Name it PLURAL & set value 1 & close the window.
5.Open Yahoo Messenger and log in with your account.
Again click on Yahoo Messenger, you will see that it will ask for a new user name and password.
Thanks for Stopping by Tech75. You can leave a comment to let me know your feedback and can also subscribe to the RSS feeds for regular updates.
Multiple login on Yahoo Messenger
1 Go to Start menu > Run > Regedit
2.Look for HKEY_CURRENT_USER/software/yahoo/pager/test.
3. On the left pane, right click on Data > click a new dword value for default.
4. Name it PLURAL & set value 1 & close the window.
5.Open Yahoo Messenger and log in with your account.
Again click on Yahoo Messenger, you will see that it will ask for a new user name and password.
Thanks for Stopping by Tech75. You can leave a comment to let me know your feedback and can also subscribe to the RSS feeds for regular updates.
Tuesday, July 27, 2010
Check your version of Windows 7
Stay aware of the operating system that is currently running on your system. Windows 7 comes into various releases such as Home premium, Professional and Ultimate editions. Get to know whether which out of these is presently installed on your system.
2. Now a window will open which will display the current version of the Windows 7 running on your PC.
Hence user can get to know the build of the Windows 7 along-with the service pack currently installed and also the name of the person this windows is licensed to.
Thanks for Stopping by Tech75. You can leave a comment to let me know your feedback and can also subscribe to the RSS feeds for regular updates.
Check Windows 7 version
1. Goto Start > Run and type in winver.2. Now a window will open which will display the current version of the Windows 7 running on your PC.
Hence user can get to know the build of the Windows 7 along-with the service pack currently installed and also the name of the person this windows is licensed to.
Thanks for Stopping by Tech75. You can leave a comment to let me know your feedback and can also subscribe to the RSS feeds for regular updates.
Delete temporary internet files in Windows 7
Is your Internet explorer in Windows 7 taking a long time to resolve any address you type in address bar to open any website. You should delete the temporary files which are present in the temporary folder of your computer by using a simple command line.

3. Now the temporary internet files will be deleted from your computer.
By deleting temporary internet files, the internet browsing can be made faster and hence releasing some memory on the hard drive.
Thanks for Stopping by Tech75. You can leave a comment to let me know your feedback and can also subscribe to the RSS feeds for regular updates.
Delete temporary internet files
1. Goto Start > Run and type this command in Run Window and press EnterRunDll32.exe InetCpl.cpl,ClearMyTracksByProcess 8
3. Now the temporary internet files will be deleted from your computer.
By deleting temporary internet files, the internet browsing can be made faster and hence releasing some memory on the hard drive.
Thanks for Stopping by Tech75. You can leave a comment to let me know your feedback and can also subscribe to the RSS feeds for regular updates.
Friday, July 23, 2010
Type the Rupee Symbol from your Keyboard
Rupee has finally got its symbol, just like the Dollar Pound and Yen. We can type the Rupee symbol from the keyboard, though it will take some time to get it on keyboard layout. You can easily install this font, start typing the Rupee symbol using the normal keyboard.
2.Go to Control Panel > Appearance and Setting > Fonts.
3. Copy and Paste the Rupee fant file in the Fonts Folder. The windows will install the font.
4 Open Notepad and select the Rupee Foradian font and type the Rupee symbol using ~ key
Use the Rupee symbol on Word, Notepad, using the ~ key.
NOTE: If you are sending a doc that has a Rupee symbol, make sure that the font is installed on other PC as well.
Thanks for Stopping by Tech75. You can leave a comment to let me know your feedback and can also subscribe to the RSS feeds for regular updates.
Type Rupee Symbol
1.Download Rupee Foradian Font.2.Go to Control Panel > Appearance and Setting > Fonts.
3. Copy and Paste the Rupee fant file in the Fonts Folder. The windows will install the font.
![]() |
| Fig: Type the Rupee Symbol Using normal keyboard. |
Use the Rupee symbol on Word, Notepad, using the ~ key.
NOTE: If you are sending a doc that has a Rupee symbol, make sure that the font is installed on other PC as well.
Thanks for Stopping by Tech75. You can leave a comment to let me know your feedback and can also subscribe to the RSS feeds for regular updates.
Thursday, July 22, 2010
How to add Watermark to image in Photoshop
Many times when you upload a image on your blog or email to a friend, that image is copied by many to put it on there sites. Some may use that photo for there use. There are many ways to protect images, watermarking is probably the most effective.
Add Watermark using Photoshop
1. Open Photoshop. Go to File > New , to open a new canvas.
2. Click on File >;Open . Select the image to which you want to add a watermark. You can also drag and drop the images to the photoshop window.
3. Similary open the watermark image also.
4. Copy the watermark image by pressing cntr+ C and paste it on the main image, by pressing cntr+ V
5. Click the watermark image layer from the toolbar on the right hand side. Click on the opacity and change it according to your need using the slider.
6. Adjust the size of the watermark logo and paste it to a desired position on the image.
That all , now your image is protected. Now who so ever uses your image you will easily recognise your image.
Thanks for Stopping by Tech75. You can leave a comment to let me know your feedback and can also subscribe to the RSS feeds for regular updates.
Add Watermark using Photoshop
1. Open Photoshop. Go to File > New , to open a new canvas.
2. Click on File >;Open . Select the image to which you want to add a watermark. You can also drag and drop the images to the photoshop window.
3. Similary open the watermark image also.
4. Copy the watermark image by pressing cntr+ C and paste it on the main image, by pressing cntr+ V
![]() |
| Fig: Watermarking Image Procedure |
6. Adjust the size of the watermark logo and paste it to a desired position on the image.
That all , now your image is protected. Now who so ever uses your image you will easily recognise your image.
Thanks for Stopping by Tech75. You can leave a comment to let me know your feedback and can also subscribe to the RSS feeds for regular updates.
Wednesday, July 21, 2010
Show legacy Recent items menu in Windows 7
Tired of recalling your recently opened files and folders in Windows 7? Recent Items link is disabled in Windows 7 by default. Now you can enable this Windows XP legacy feature in Windows 7. Here is how you can enable it from Start menu properties.
1. Right-click on Start and click Properties and press Customize under Start Menu tab.
2. Scroll down and locate Recent Items and enable the checkbox in front of it and hit OK.
3. Now click on Start and you can find the Recent Items menu displaying all your Recent items.
Thereby, you can bring the legacy Windows XP recent items in Windows 7 start menu by enabling this feature from the Start menu properties. Handy recalling all your recent items with just a click away in Windows 7 start menu. Isn't it? Thanks for Stopping by Tech75. You can leave a comment to let me know your feedback and can also subscribe to the RSS feeds for regular updates.
1. Right-click on Start and click Properties and press Customize under Start Menu tab.
2. Scroll down and locate Recent Items and enable the checkbox in front of it and hit OK.
3. Now click on Start and you can find the Recent Items menu displaying all your Recent items.
Thereby, you can bring the legacy Windows XP recent items in Windows 7 start menu by enabling this feature from the Start menu properties. Handy recalling all your recent items with just a click away in Windows 7 start menu. Isn't it? Thanks for Stopping by Tech75. You can leave a comment to let me know your feedback and can also subscribe to the RSS feeds for regular updates.
Tuesday, July 20, 2010
Rate and Improve you PC Rating
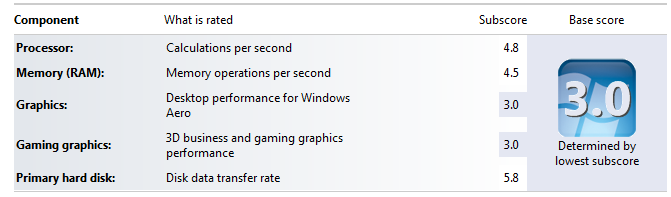
In Windows 7 , there is a built in performance rating tool, with the help of which you can check how system performs. By rating you will get information regarding your PC as it is compared to some standard value.You can also have tips to improve your system performance.
Rate you PC
1. Click on Start > Control Panel
2. Go to Performance Information and Tools
3. Click on Rate this PC.
4. The Windows will test all the basic parameter in your PC and it will rate in range from 1.0 to 7.9.

5. Windows will also suggest some tips to improve the performance.
The Windows will judge your PC and will suggest a score on the scale of 1.0 to 7.9 and will this you can come to know the weak areas in your PC.
Thanks for Stopping by Mobiles Galaxy. You can leave a comment to let me know your feedback and can also subscribe to the RSS feeds for regular updates.
Rate you PC
1. Click on Start > Control Panel
2. Go to Performance Information and Tools
3. Click on Rate this PC.
4. The Windows will test all the basic parameter in your PC and it will rate in range from 1.0 to 7.9.

5. Windows will also suggest some tips to improve the performance.
The Windows will judge your PC and will suggest a score on the scale of 1.0 to 7.9 and will this you can come to know the weak areas in your PC.
Thanks for Stopping by Mobiles Galaxy. You can leave a comment to let me know your feedback and can also subscribe to the RSS feeds for regular updates.
Wednesday, January 27, 2010
Automatic Logon to you Windows 7
If you are the only person who can access the PC and you don't need to secure it with a password, then u can use automatic logon to save few seconds.
You can remove the password you want but keep in mind the security ofyour PC before doing that.
This will boot right to your desktop without any need to enter a password and wait for loading. Please be aware that anyone could use your computer by doing this, so consider the security aspect first.
- Select Run from the start menu
- Write Control userpasswords2 in it and click on ok
- A window will pop up wih all the users that have the access to the PC. Select the USER and uncheck on users must enter a username and password to use this computer box

- Click on OK
- Another window will then appear which prompts you to enter the password (twice) for the auto login account and Click OK.
You can remove the password you want but keep in mind the security ofyour PC before doing that.
Tuesday, January 26, 2010
Access Control for Application AppLocker
With AppLocker, you can restrict other to have an access to your files.
1. Click on Start & type Gpedit.msc
2. Go to Computer Configuration > Window setting > Security Setting > Application Control Policies > Applocker
3.Right Click on ony one option(Executable, Installer, or script) and create a new rule.
After this your files, documents and folders are safe as now no one can access it without your permission.
Thursday, January 21, 2010
Resize image in Window 7 with Powertoy
Looking for a simple tool to handle all resizing actions of digital images in Windows 7? Here is a very simple and easy method to resize an image in window 7 and i.e Powertoy Clone.
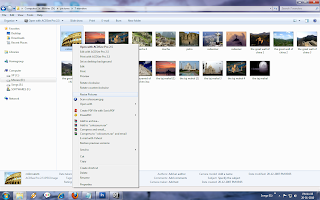
Image Resizer Powertoy Clone for Windows is set up to integrate seamless with the operating system’s graphical user interface. In this regard, users will be able to easily access the Powertoy via Windows Explorer, namely right-clicking on an image and selecting the Resize Pictures option from a menu that will pop up.

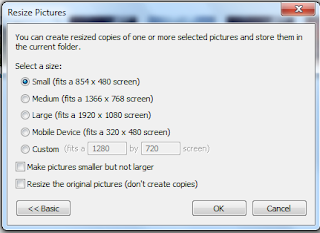
The Powertoy delivers batch resize capabilities, it can handle multiple images at a time. The tool permits users to create copies of the pictures resized and to store them in the same folder as the original images.
There are four default sizes for the image:

1. Small – 640x480 pixels,
2. Medium - 800x600 pixels,
3. Large 1024x768pixels,
4. Handheld 240x320pixels.
This is not all, Image Resizer Powertoy Clone.for Windows 7 also comes with Advanced options, in wich a user can enter their own custom size.
In this,all the editing will be done o the original one and no other copy will be created.
Did you enjoy the post???
Why don't you leave a comment or subscribe to the RSS feed or receive the latest information delivered to your mail.
Image Resizer Powertoy Clone for Windows is set up to integrate seamless with the operating system’s graphical user interface. In this regard, users will be able to easily access the Powertoy via Windows Explorer, namely right-clicking on an image and selecting the Resize Pictures option from a menu that will pop up.

The Powertoy delivers batch resize capabilities, it can handle multiple images at a time. The tool permits users to create copies of the pictures resized and to store them in the same folder as the original images.
There are four default sizes for the image:

1. Small – 640x480 pixels,
2. Medium - 800x600 pixels,
3. Large 1024x768pixels,
4. Handheld 240x320pixels.
This is not all, Image Resizer Powertoy Clone.for Windows 7 also comes with Advanced options, in wich a user can enter their own custom size.
In this,all the editing will be done o the original one and no other copy will be created.
Did you enjoy the post???
Why don't you leave a comment or subscribe to the RSS feed or receive the latest information delivered to your mail.
Tuesday, January 19, 2010
Hidden Wallpapers and Themes in Window 7
Window 7 has a lot of good features and are hidden from the World. Do you know Window 7 has many good wallpapers and themes that are not advertise.
It has got 30 pictures of 1900X1200 resolution HD images and 5 themes related to 5 different regions of the world.
To unlock this follow these simple steps
1.Open a Start menu search bar and Search for the term Globalization.Open the Globalization folder and you will find ELS and SORTING folders.
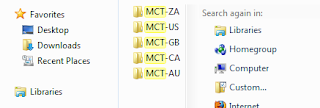
2.Search for MCT in the top right search bar. This will display you 5 folders corresponding to differnt regions of the world.

3.Browse these folders for extra themes and wallpers.
Did you enjoy the post???
Why don't you leave a comment or subscribe to the RSS feed or receive the latest information delivered to your mail.
It has got 30 pictures of 1900X1200 resolution HD images and 5 themes related to 5 different regions of the world.
To unlock this follow these simple steps
1.Open a Start menu search bar and Search for the term Globalization.Open the Globalization folder and you will find ELS and SORTING folders.
2.Search for MCT in the top right search bar. This will display you 5 folders corresponding to differnt regions of the world.

3.Browse these folders for extra themes and wallpers.
Did you enjoy the post???
Why don't you leave a comment or subscribe to the RSS feed or receive the latest information delivered to your mail.
Monday, January 18, 2010
Save Word file as PDF file
When you want a PDF file what do you do? Mostly people will search a word to PDF file converter. What heppens sometime you download something and it doesnot go accordingly.
If you want a PDF file you need not to download any software. If you have Microsoft office 2007 it mor than sufficient. It has got the feature to nake a word file to PDF.

When you want to have a PDF file from a word file you just need to follow these steps
1.Click on the office button and go to save as
2. From there select PDF or XPS
3. click on Publish after selecting the location
Now your PDF file is ready. This file wll openas an normal PDF file in Adobe reader.
Did you enjoy the post???
Why don't you leave a comment or subscribe to the RSS feed or receive the latest information delivered to your mail.
Sunday, January 17, 2010
Offline gmail
You all must be thnking what is this? Well this is a new feature launched by google in labs.There are times when you are unable to access your gmail account it may be due to connection problem or some other problem. Keeping this point in view, this feature is being used.
With this feature you will be able to read all your mails even if you're offline, you jsut have to open your web browser, go to gmail.com, and get to your mail just like you're used to. In this , Gmail donwloads a local cache of your mail.When you need to send a mail in the offline mode, it will be saved in your outbox and send the mail automatically later.
This feature is in the testing stage, so there may be some problems with it. To enable this feature you have to follow some simple steps:
1. Click Settings and click the Labs tab.
2. Select Enable next to Offline Gmail.
3. Click Save Changes.
and you are now on with the offline mode of Gmail.
Did you enjoy the post???
Why don't you leave a comment or subscribe to the RSS feed or receive the latest information delivered to your mail.
Wednesday, December 30, 2009
Rename the Administrator account
Renaming the administrator account in Window 7 is a very easy. If you want that your name should be displayed on the screen when you logg on to your PC then you would have to follow some really easy steps to do so and rename the built-in Administrator account name to a name you like instead to be displayed in the log on screen and Start menu in Windows 7. You can have better security by not using the same default name as everyone else to log in with.
follow these easy steps:
1. Click on start menu and go to control panel.
2. Go to User Account and family safety option.

3. Under User Account click on Add or Remove an User Account.

4.There you will see three Icons, the Administrator Icon, User Icon and Guest Icon.

5. Click on Administrator Icon.
6. When you click on the Icon, it will show a window which will show the various options for the account.Now click on the Rename option and now change the name to the desired name.

Did you enjoy the post???
Why don't you leave a comment or subscribe to the RSS feed or receive the latest information delivered to your mail.
follow these easy steps:
1. Click on start menu and go to control panel.
2. Go to User Account and family safety option.

3. Under User Account click on Add or Remove an User Account.

4.There you will see three Icons, the Administrator Icon, User Icon and Guest Icon.

5. Click on Administrator Icon.
6. When you click on the Icon, it will show a window which will show the various options for the account.Now click on the Rename option and now change the name to the desired name.

Did you enjoy the post???
Why don't you leave a comment or subscribe to the RSS feed or receive the latest information delivered to your mail.
Sunday, December 27, 2009
Enable or Disable the Administrator account in Window 7
The built-in Administrator account is an account that has full access and permission on the computer. Like Window Vista, Window 7 Administrator account can be enabled or disabled.
By default, the built-in administrator account is named Administrator, and is disabled.
The Method to enable or disable the Administrator account is :
1. Open start menu, and type Lusrmgr.msc in search box and press enter. This will open Local Users and Group.

2. On the left hand side , click on the User Folder.

3. Right click on Administrator and click on the properties.
4. Now to enable the Administrator Account
(i)Uncheck the Account is disable box.
(ii) Click on OK

5. Now if you want to disable the Account
(i) Check the Account is Disable Box
(ii) Click on OK
6. Close the Window and logg off and now you will see you logg in icons on the window one for the Administrator and the other is the User Account.
Did you enjoy the post???
Why don't you leave a comment or subscribe to the RSS feed or receive the latest information delivered to your mail.
By default, the built-in administrator account is named Administrator, and is disabled.
The Method to enable or disable the Administrator account is :
1. Open start menu, and type Lusrmgr.msc in search box and press enter. This will open Local Users and Group.

2. On the left hand side , click on the User Folder.

3. Right click on Administrator and click on the properties.
4. Now to enable the Administrator Account
(i)Uncheck the Account is disable box.
(ii) Click on OK

5. Now if you want to disable the Account
(i) Check the Account is Disable Box
(ii) Click on OK
6. Close the Window and logg off and now you will see you logg in icons on the window one for the Administrator and the other is the User Account.
Did you enjoy the post???
Why don't you leave a comment or subscribe to the RSS feed or receive the latest information delivered to your mail.
Thursday, December 24, 2009
Recovering the Deleted data
Many times this thing happens that you accidentally delete some of your important data permanently. What you do in that case?
Either download that data again or if you were doing it on office that you have to do it again.
There is one another way to save time and that is to recover the lost data. This can be done with the help of some software.

One of the software with which you can recover the lost data is by using recuva software. This software can recover data form your PC, MP3 players or Digital cameras.
With the help of recuva you can restore any type of deleted data.
It can also restore your unsaved word document.
You can download this software form Recuva
Did you enjoy the post???
Why don't you leave a comment or subscribe to the RSS feed or receive the latest information delivered to your mail.
Either download that data again or if you were doing it on office that you have to do it again.
There is one another way to save time and that is to recover the lost data. This can be done with the help of some software.

One of the software with which you can recover the lost data is by using recuva software. This software can recover data form your PC, MP3 players or Digital cameras.
With the help of recuva you can restore any type of deleted data.
It can also restore your unsaved word document.
You can download this software form Recuva
Did you enjoy the post???
Why don't you leave a comment or subscribe to the RSS feed or receive the latest information delivered to your mail.
Subscribe to:
Posts (Atom)
Categories
- Amazon (1)
- Android (4)
- Apple (9)
- Attachments (1)
- Barnes n Noble (1)
- Blackberry (5)
- Bookmarks (2)
- books (1)
- Chat (2)
- Dell (5)
- Dictionary (1)
- Drag-and-drop (1)
- e-book reader (3)
- Edit (4)
- Email (2)
- Extensions (5)
- Facebook (12)
- File compression (1)
- Firefox (2)
- Gadgets (52)
- Gmail (11)
- Google (35)
- Google Chrome (8)
- Google Labs (2)
- Hardware (1)
- Hauwei (1)
- Hewlett Packard (3)
- Hotmail (1)
- HTC (5)
- HTML5 (1)
- Interesting (13)
- internet (36)
- Internet Explorer (10)
- iPhone 5 (1)
- Keyboard (7)
- Lenovo (2)
- LG (2)
- Live Video (2)
- Login (3)
- mail (2)
- Micromax (2)
- Microsoft Word (1)
- mobile world (78)
- Motorola (8)
- Mozilla Firefox (7)
- Nokia (20)
- Olive (2)
- Opera (1)
- Ovi (2)
- Password (1)
- PC (32)
- Safari (1)
- Samsung (5)
- Security (4)
- Servers (2)
- Sharp (1)
- Social Application (3)
- Social Gaming (1)
- Software (11)
- Softwares (2)
- Sony Ericsson (4)
- Symbian (3)
- Symbian Anna (1)
- Tablet (4)
- TAG heuer (2)
- Templates (1)
- Themes (3)
- TIPS (104)
- Tools (16)
- TouchScreen (23)
- Tricks (61)
- Twitter (2)
- Video (3)
- Web (2)
- Web browser (7)
- Windows 7 (26)
- Windows XP (3)
- yahoo (1)
- youtube (4)